Monday, January 11, 2010

Engine Bay Priming April 08

I turned my attention back to the engine compartment late in April. With the new frame on it's way I wanted to at least get the priming done before it got here. But first I had to learn how to use a paint sprayer and we had to build some kind of a paint booth to contain the over spray


We constructed a simple structure of 2x4's, it even had castering wheels!


We found these brackets at the local building supply, they made the assembly go fast.


Here's a shot of one of the wheels.


This was taken after I had finished spraying the primer. It shows how the booth worked. The sides, top and back were covered in plastic tarp stapled to the 2x4's.  Two 24 inch square fans were framed in, one on each side. One fan pushed and the other pulled air and each had a filter taped to it. This created a cross flow of air and believe it or not it worked pretty well.


A shot taken just after the primer was sprayed on, I was very happy with the results although I know I could do better with better equipment and paint.


A tighter shot of the same area.


A shot of the drivers side, the strengthening bracket can be seen bottom center.


A closer shot of the same area.


I also painted the areas of the fender wells that had been stripped, the buffer areas and sills.


The front end,  that dent in the valance is part of the patina of this car!


Under Boot Prep and Painting April 08


After completing work on the floor boards, I decided why stop there? So I tackled the rear underside of the car including the spare tire compartment, the areas flanking it, the rear valance and the wheel wells. There was lots and lots of dirt and road grime here but again very little rust. I had decided to leave the rear wings in place as they were quite happy where they were. So it was very difficult to get all of the dirt out of the areas in the far rear corners of the car. But I got most of it!


This is a shot of the spare tire compartment with the rear valance visible at the bottom of the picture. Any undercoat or grease slung back from the diff had been baked on. There was some surface rust on the valance.


The dreaded (for cleaning) rear quarter area. It's the area between the wing and the tub that was so hard to clean, in retrospect I probably should have gone ahead and just removed the rear wings!


A closer look at the spare tire compartment. The crud baked on by the exhaust system can be better seen.


This is a look at the front of the fender well, that's the seat belt attachment point there lower left of center. The under coat in the fender well was actually in good shape.


The spare tire compartment after cleaning prepping and coating with rust killer. The rear quarter area is just visible to the left. I took a ginormous amount of dirt out of this area but only treated the areas that showed any signs of rust.


The rear valance. I paid special attention to this area as there was significant surface rust here.


The rear quarter area, very little rust here, the under coat seems to have worked! This area received a good cleaning, any loose under coat was removed and the painted areas were prepped for priming.


The rear quarter area on the other side, again no rust just dirt and lots of it!


A shot of the spare tire compartment and rear valance after priming and first top coat.


The passenger side rear quarter. The rear main body mount can be seen here and that's the bumper bracket hole just below.


And the other side. After the second top coat dries, the entire boot section will be sprayed with a rock guard type under coat. 


Sunday, January 10, 2010

Floorboard Prep and Painting April 08

After the the tub had been raised and the frame removed, there was a lot of room underneath. It became kind of inviting and I had a couple of more weeks before the new frame's arrival, so why get after that dirty underside of the car?


Yup, lots a room under there to enjoy cleaning all the forty years of grime!


This is the drivers side floorboard in before condition. Nothing too horrible here.


And the passenger side, about the same condition. Some baked on transmission oil and road dirt, otherwise in pretty good shape.

 
Here's one of the front main body mount brackets, a little surface rust showing near the sill.


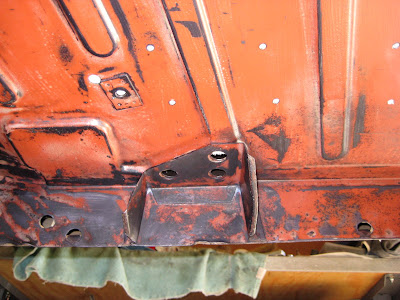
A shot of the rear main body mount bracket. Note that the frame was rubbing middle of the picture towards the top. The rectangular piece of sheet metal and welded 1/4 inch nut visible near center picture are one of four seat track mounts on each side. This was another area of questionable design. There were cracks in three of the eight nut plates, probably caused by a combination of the spot welds and fatigue from the seat rocking. More on this later...


An interesting shot looking back towards the spare tire compartment. The engine hanging upside down is just visible in the background.


The floorboard after after treatment with a rust killer. I first cleaned using Simple Green, a brush and a pale of water. Very dirty work! I then went after any rust using a wire wheel on a right angle drill, an assortment of wire brushes, sandpaper, scrappers and a whole lot of elbow grease. 


One of the rear main body brackets after treatment.


And the front.


This is a shot of the rear section of the drivers side. Note the rather large hole center right, this was where one of the rear nut plates once resided. It was so badly cracked that we just removed it. We'll fix it later.


The same area after a coat of primer, like the interior and boot areas, I brushed all of the coatings on (not so easy when lying on your back).


And the front section


From the rear looking forward.


This is a shot of the front section of the passengers side after the first coat of black semi gloss top coat.


And the rear section.


A shot of the rear main body mount bracket.


And the front.