It was time to finish the engine bay and get rid of the paint booth. Before I could apply the top coat, I had to first apply the seam sealer. I had done this already in the interior (see interior painting March 08) with acceptable results using the 3M gun and tube system. This gave me some practice so that I wouldn't mess up the seams in the engine compartment where they would be visible
To work on the engine compartment, the procedure was push the paint booth back and pull the frame out into the driveway. Kind of a pain in the ass, but with the limited space I had there was no choice.
A shot of the passenger side, I wanted to be careful here, as these seams will show.
And the drivers side.
Here's the driver's side, the valence is on the right, the front body mount center bottom and the headlight bulge upper right.
A view of the lower passenger side firewall. The improved body mount (Body Mount Mod Engine Bay March 08) can be seen just left of center.
This shot shows the upper passenger side buffer area, no need to be neat here, just want to make sure everything is sealed!
And this is the lower half of the same side. I wanted to make darn sure that the inside corner was sealed, this was one of few places on the car that had serious rust (see Stripping the Buffer Area January 08).
A shot of the bottom rear area of the wheel well. Again, this area doesn't have to look nice, but it must be well sealed.
After the seam sealer had time to cure, I masked off the car and used the same kind of spay paint system as was used for the primer coat. I used a basic enamel in semi-gloss black, if I had this to do again I would probably have used a more exotic paint such as a 2 part urethane. I am happy with the results but worried about the longevity of the paint.
Here's a shot the firewall.
The front of the passenger side fender.
This is the fire wall again from different angle.
A view of the drivers side fender.
A straight on shot, shortly after this picture was taken the paint booth was disassembled having preformed it's job admirably.
Tuesday, August 31, 2010
Frame Arrival May 08
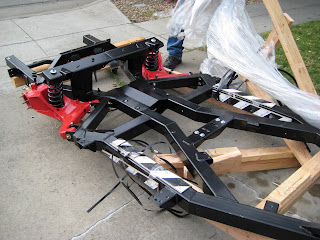
After waiting for almost 7 months the frame was scheduled to arrive by truck. When the highly anticipated moment finally came and the truck pulled up in front of my house, I eagerly waited to see my very expensive, beautifully built and finished frame in person for the first time. Imagine my horror when the first thing that I saw was that the carefully crafted packaging was an absolute mess! They had obviously dropped it!
The frame has arrived! That's my TR-3 sitting in front there. I was sooo excited!!
This was my first look at my frame, can you say horrified?
Splintered wood and busted strapping, a real mess...
This was, as it turned out, the worst of the damage. The studs were toast but luckily for me, the trailing arm and the frame were uninjured except for some relatively minor scratches and chips in the powder coat.
This is after we managed to drag the frame out of the truck and place it in my driveway. As you can see, the pallet has become kindling.
A close up the the deranged studs.
A shot of the front suspension, must have been one of the impact areas?
Safely tucked under the TR-6, in it's new home! The frame is sitting 2 furniture movers, so it will be a relatively easy task to pull it out into the driveway and to work on it. And a lotta work ahead there is....
Subscribe to:
Comments (Atom)


